Overview
In today’s article, I will explain how I implemented “NOS Test”, a side-project I developped for automating some manual testing at Nuxeo. Nuxeo Online Services (NOS) team develops and maintains all the online services for Nuxeo: Studio, Connect Dashboard, Marketplace, etc. It is important to verify everything works as expected. Besides unit tests and integration tests running in CI, we also check the key results manually after each deployment. However, the manual process is long and very basic.
The goal of “NOS Test” is to empower developers in this process. By asserting
web pages, RESTful APIs, and Nuxeo Server command line nuxeoctl, we are able
to do much more. After reading this article, you will understand:
- The architecture of “NOS Test”
- The main technologies used for each components
- The interests of having such tool
- Next steps
Architecture
“NOS Test” is written 100% in Java. It consists 3 components: Browser Testing,
API Testing, and nuxeoctl Testing for Nuxeo Server. They are stored in
separated packages:
com.nuxeo.test.browserfor testing browsercom.nuxeo.test.restfor testing RESTful APIscom.nuxeo.test.nuxeoctlfor testing Nuxeoctl
Each component contains one test-suite. A test-suite is a sequence of tests to perform. Note the tests are ordered, because in some cases, a test can only be launched based on the result of another test. For example, you have to login before visiting private pages. Detail about its test will be discussed later.
This tool is built using Maven and packaged as a flat JAR with all dependencies. You can use it as:
$ java -jar nos-test-xxx.jar [--project <id>] [--env <name>]
The two optional options, project and environment, provide more flexibility
to this tool. Option “project” (--project <id>) allows to choose the desired
Studio project to be asserted, defaults to my sandbox; Option “environment”
(--env <name>) allows to choose the desired environment to test (production,
pre-production, UAT, development), defaults to pre-production (preprod)
environment. Now we saw the architecture overview, let’s visit each component
and see how they work.
Browser Testing
Browser test suite is created as follows, with the URL of the website, the project ID and user’s credentials.
BrowserTestSuite browserTestSuite =
    BrowserTestSuite.newBuilder() //
        .siteUri(siteUri)
        .projectId(projectId)
        .user(username, password)
        .build();
browserTestSuite.run();
Browser test suite is implemented using Selenium WebDriver, a testing tool compatible with all major web browsers. In my case, the code is only tested with Firefox, but it should be easy to use other browsers in the future. Currently, the browser test suite is very basic: it will login to the website, nagivate to Studio project given by user, and ensure the web page is loaded correctly.
Pages pages = Pages.login(driver, siteUri, username, password);
pages.studioModelerHome(projectId);
At the end of the test suite, the HTTP cookie JSESSIONID is retrieved and
stored. It will be re-used in API testing, because some APIs do not accept basic
authentication. They can only be used when user is authenticated via Central
Authentication Service (CAS). Having the cookie JSESSIONID allows to simulate
such situation.
API Testing
API test suite is created as follows, with two JAX-RS clients authenticated via basic auth and via CAS (cookie), the project to assert and the expected range of hot-fixes:
ApiTestSuite apiTestSuite =
    ApiTestSuite.newBuilder()
        .basicAuthClient(basicAuthClient)
        .casAuthClient(casAuthClient)
        .projectId(projectId)
        .withHF("nuxeo-10.10", 10)
        .withHF("nuxeo-9.10", 33)
        .withHF("nuxeo-8.10", 46)
        .build();
apiTestSuite.run();
API test suite is implemented using Jersey, the reference implementation of Java™ API for RESTful Web Services (JSR-370). At the implementation level, all the resources available on Nuxeo Online Services are described as Java interfaces. The actual deserialization from HTTP response is delegated to Jersey’s WebResourceFactory. Here is an example about resource described as interface. As you can see, it is concise and declarative:
@Path("/nuxeo/site/studio/maven/nuxeo-studio")
public interface StudioMavenResource {

  @GET
  @Path("/{projectId}")
  @Produces(MediaType.TEXT_HTML)
  Response getProjectPage(@PathParam("projectId") String projectId);

  @GET
  @Path("/{projectId}/maven-metadata.xml")
  @Produces(MediaType.WILDCARD)
  Response getMavenMetadataXml(@PathParam("projectId") String projectId);

  @GET
  @Path("/{projectId}/maven-metadata.xml.md5")
  @Produces(MediaType.WILDCARD)
  Response getMavenMetadataXmlMd5(@PathParam("projectId") String projectId);

  ...
}
WebResourceFactory defines a high-level (proxy-based) client API. The API enables utilization of the server-side JAX-RS annotations to describe the server-side resources and dynamically generate client-side project objects for them. Once generated, it can be used directly in the code to perform HTTP request and to get the deserialized result in Java:
StudioMavenResource rMaven =
    WebResourceFactory.newResource(StudioMavenResource.class, webTarget);
Response page = rMaven.getProjectPage(projectId);
Response xml = rMaven.getMavenMetadataXml(projectId);
Response md5 = rMaven.getMavenMetadataXmlMd5(projectId);
In “NOS Test”, 36 endpoints are being tested, mainly for GET operations. It also focus on regression: new tests are added if regression detected on production. As you can see, adding more resources will be effortless. Declaring a new interface with a few annotations will be enough. There is also possibility to map JSON response to Java automatically thanks to Jackson JSON provider, registered in Jersey client. There are several reasons why I chose JAX-RS over other technologies:
- JAX-RS interfaces mentioned above is declarative and easy to be integrated
- JAX-RS had been actively used by the NOS team for at least 2 years, similar concepts on interfaces
- JAX-RS is well known by team members
- Compared to other command line or GUI tools, JAX-RS has benefits from the Java type system, assertions for HTTP response is much easier. E.g. testing the MD5 checksum of XML file
Nuxeoctl Testing
Nuxeoctl testing is created as follows, with download directory for storing the Nuxeo Server (ZIP) download from internet, the server version, the username, the project id, the token and also the site URL.
NuxeoctlTestSuite nuxeoctlTestSuite =
    NuxeoctlTestSuite.newBuilder()
        .downloadDir(downloadDir)
        .server(NuxeoServer.SERVER_10_10)
        .username(username)
        .projectId(projectId)
        .token(token.value())
        .siteUri(siteUri)
        .build();
nuxeoctlTestSuite.run();
Nuxeoctl test-suite manipulates Nuxeo Server by sending commands to the server directly: register as the target user, list marketplace packages, install marketplace packages or more. This is done using java.lang.Process, which allows you to have a native process. It can be used to control the process and obtain information about it. In my case, commands are sent to Nuxeo Server process, and “NOS Test” waits until the command to be complete. Exit code is then verified.
Here’s an excerpt for building a process based on Bash and Bash script
$SERVER/bin/nuxeoctl:
private ProcessBuilder newProcess(String... args) {
  String nuxeoctl = serverHome.resolve("bin/nuxeoctl").toAbsolutePath().toString();
  String[] command = new String[2 + args.length];
  command[0] = "bash";
  command[1] = nuxeoctl;
  System.arraycopy(args, 0, command, 2, args.length);
  return new ProcessBuilder(command).inheritIO();
}
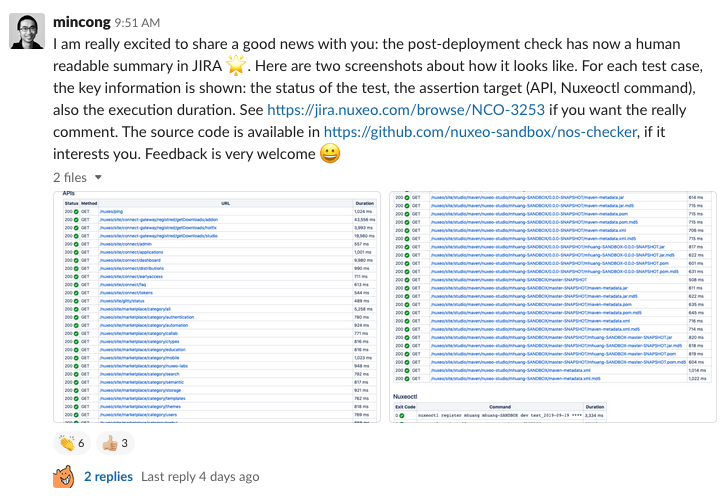
Report
After each execution, a text block is generated using JIRA syntax, which contains the essential information about each tests.
Impact
Thanks to project “NOS Test”, the verification process becomes much easier than the manual one. Here’re some advantages I can see:
- Better test coverage, compared to manual testing
- Parameterized input data
- Strict regression control
- Execution time measurement
- Consistency in verification process, same test suites for each deployment
- One line execution
- Report is easy to share (command line output)
- Audit
Next Steps
As you can see, this tool is still in its very early stage. There are a lot of improvements can be done in the future. Here are some of them that I have in mind, grouped by component.
Command line:
- Show command line usage (
help) if the command entered was incorrect. - Expose more parameters to users to refine the test
- Support “NOS Test” run command file (
.nostestrc) to avoid typing the command line options everytime. - Provide verbose option (
-v,--verbose) to enable or disable verbose output.
Browser:
- Visit more web pages
- Interact with web page to assert results
- Test via other drivers, such as Chrome Driver
API:
- Send HTTP requests concurrently to save time
- Do POST and DELETE requests
- Improve API coverage
Nuxeoctl:
- Test more commands
- Extract server output from
Processand assert - Test all supported Nuxeo Servers, not only Nuxeo LTS 2019 (10.10)
- Measure the time spent
Conclusion
In this article, I explained the side project “NOS Test” that I started on 22nd July, 2019 by sharing its architecture and its three components: browser, API and Nuxeoctl. I explained its impact and some potentials about this tool. Hope you enjoy this article, see you the next time!
References
- Selenium, “SeleniumHQ/Selenium: A browser automation framework and ecosystem.”, GitHub, 2019. https://github.com/SeleniumHQ/selenium/
- Jersey, “eclipse-ee4j/jersey: Eclipse Jersey Project”, GitHub, 2019. https://github.com/eclipse-ee4j/jersey
- Java Community Process, “JSR 370: Java™ API for RESTful Web Services (JAX-RS 2.1) Specification”, Java Community Process, 2017. https://jcp.org/en/jsr/detail?id=370
- Jersey, “WebResourceFactory (jersey 2.0 API)”, Jersey, 2013. https://jersey.github.io/nonav/apidocs/2.0/jersey/org/glassfish/jersey/client/proxy/WebResourceFactory.html
- Oracle, “Process (Java Platform SE 8)”, Oracle, 2019. https://docs.oracle.com/javase/8/docs/api/java/lang/Process.html