Introduction
In the past articles, we saw how to index new documents for the open dataset “Demande de valeurs foncières (DVF)” provided by the French government. We also saw how to optimize the indexing process and optimize storage. In this article, we are going to see something new: how to snapshot and restore in Elasticsearch.
But why do we want to do that? We want to snapshot data and store them as a backup because it reduces the risk of data loss. If anything goes wrong in the Elasticsearch cluster, we will be able to recover from the situation by restoring the backups. It makes our storage system much more reliable. Having snapshots also means having the possibility to move data around multiple clusters, reducing the number of data replication (especially for warm storage), etc. However, only knowing how to snapshot is not enough, it’s also essential to understand how to restore your data and demonstrate that it works before running into any actual incidents. That’s why it’s important to understand how to snapshot and restore works in Elasticsearch.
In this article, we are going to see some basics about snapshot and restore in Elasticsearch using the filesystem. After reading this article, you will understand how to:
- How to create a new snapshot repository of type
fs(filesystem)? - How to create a new snapshot for one or multiple indices?
- How to monitor the status of a snapshot creation?
- How to list snapshots of a given repository?
- How to restore a snapshot to an Elasticsearch cluster?
Note that this article is written using Elasticsearch 7.10 with Java 11. Now, let’s get started!
Register A Snapshot Repository
Before performing any snapshot operations (creation, listing, restore, deletion, …), you need to create a snapshot repository first. There are different types of snapshot repositories. Cloud repositories need additional repository plugins to communicate with the target storage system. Here are the core types of repositories and their related plugins:
| Name | Type | Plugin |
|---|---|---|
| Filesystem | fs |
(built-in) |
| Amazon S3 | s3 |
S3 Repository Plugin |
| Google Cloud Storage | gcs |
Google Cloud Storage Repository Plugin |
| Azure | azure |
Azure Repository Plugin |
| Hadoop HDFS | hdfs |
Hadoop HDFS Repository Plugin |
Depending on the underlying infrastructure used, it makes sense to choose
one of these plugins and store your data there. For example, if you are using
Amazon Web Services in your company, you probably want to use s3 for
storage. For this article, we are going to use the default fs one to facilitate
the set up so that we can focus on the snapshot operations. ⚠️ cloud snapshot
plugins are not part of this article.
Before registering a snapshot repository, you need to ensure that the cluster is
started with the right configuration. For using a shared file system repository
(fs), you need to declare the path.repo setting in Elasticsearch
configuration, such as elasticsearch.yml or environment variable path.repo.
In my demo, I am using the Elasticsearch Docker image and the path
/opt/elasticsearch/backup as the root path of repositories. This path is then
bound to environment variable esbackup in my mac.
esbackup="${HOME}/es-backup/demo-dvf/"

docker run \
  --rm \
  -p 9200:9200 \
  -p 9300:9300 \
  -e "discovery.type=single-node" \
  -e "cluster.name=es-docker-cluster" \
  -e "path.repo=/opt/elasticsearch/backup" \
  -v "$esdata":/usr/share/elasticsearch/data \
  -v "$esbackup":/opt/elasticsearch/backup \
  docker.elastic.co/elasticsearch/elasticsearch:7.10.1
Now the path.repo is defined and the cluster is
started, it’s time to register a snapshot repository! In my case, all the data
of index transactions have been indexed in the previous articles. So I just
need to call the API to register the repository. Since this project is around
DVF, so I am going to call the repository as “dvf”. The related PUT
request should be sent as follows:
PUT /_snapshot/dvf
{
  "type": "fs",
  "settings": {
    "location": "dvf"
  }
}
Note that the JSON path settings.location refers to the path of this
repository. It can be an absolute path or a relative path. Regardless it is
absolute or relative, the canonical path must be under the root directory path.repo
defined in Elasticsearch configuration. To better understand the location
setting, I prepared two screenshots for you, respectively for absolute path and
relative path:
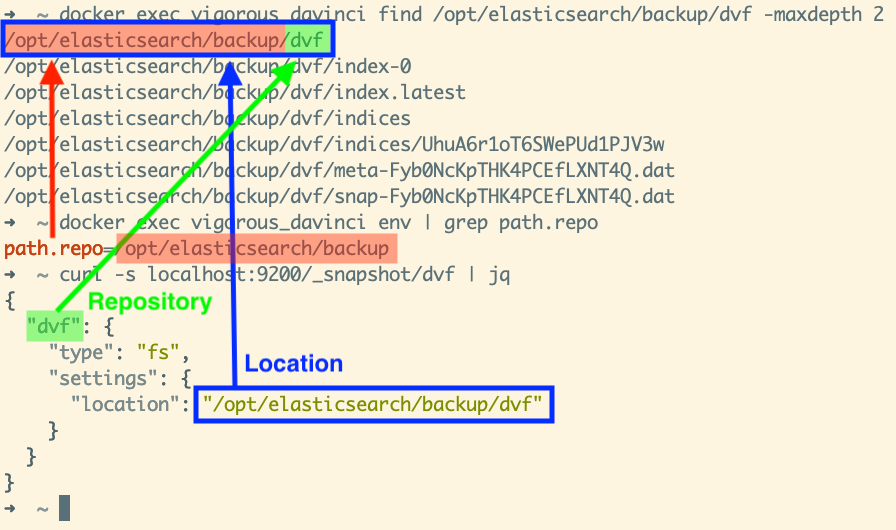
In the screenshot above, we use an absolute path. You can see that the repository is located in path
/opt/elasticsearch/backup/dvf in the color blue. This path is under the root path of all repositories
(path.repo), which is /opt/elasticsearch/backup in the color red. The name of
the repository is called “dvf”,
written in color green. Also, from the find command, we can see that all the
data related to this repository are written inside the target location.

Now let’s take a look into the other version, done with the relative path. In the
screenshot above, you can see that the repository is located in
/opt/elasticsearch/backup/dvf in the color blue. The path.repo
is still /opt/elasticsearch/backup in color red. And the name of the
repository is called “dvf”, written in color green.
I believe this relative path is better because it allows us to decouple the
location settings with the actual location. We let Elasticsearch resolve the
actual path by looking into the path.repo settings and the location setting.
Therefore, in the Elasticsearch client, we won’t need to know the real path
anymore.
Now we understand the difference between the root path of all the repositories
(path.repo), the name of the repository, and the location of the repository.
Let’s see how to write the same logic in Java using the Java High Level REST
Client. The code is easy to understand: you need to create a PUT repository
request with the name of the repository and the type of repository. Since we use
type fs here, we also need to provide the location, which is the relative path
“dvf”. Then, use an instance of the Java High Level REST client to retrieve
the underlying snapshot client. And finally, submit a request to perform the
creation. By the way, we are using the synchronous version here
(createRepository). There is also the asynchronous version:
createRepositoryAsync.
var request = new PutRepositoryRequest()
    .name("dvf")
    .type("fs")
    // Use relative path "dvf" and let Elasticsearch
    // to resolve the canonical path using environment
    // variable `repo.path`.
    .settings(Map.of("location", "dvf"));
var response = restClient.snapshot()
    .createRepository(request, RequestOptions.DEFAULT);
Create Snapshot
Now we have a snapshot repository, we can create a snapshot inside it. You can
create a new snapshot by sending a PUT HTTP request. The following request is
sent to repository dvf for creating a new snapshot called backup.2021-01-10
with some additional options provided in the request body. Option indices
describes the list of indices to snapshot; option include_global_state
describes whether the snapshot should include the cluster global state (we will
talk about this right after). Option metadata which includes some metadata for
the snapshot; and more options that you can find in the official documentation
of Elasticsearch page “Create a snapshot
(7.x)”.
PUT /_snapshot/dvf/transactions.2021-01-10
{
  "indices": "transactions",
  "include_global_state": false,
  "metadata": {
    "taken_by": "Mincong",
    "taken_because": "regular backup"
  }
}
According to the official document “Create a snapshot (7.x)” mentioned above,
the option include_global_state is useful to choose whether you want to store the
cluster state as part of the snapshot. The global cluster state includes the
cluster’s index templates, such as those matching a data stream. If the snapshot
includes data stream, it’s recommended to store the state as part of the
snapshot so that later, you can restore templates required for a data stream.
In our case, we don’t need this because we don’t have any data stream.
Now we understand which endpoint to use and its available options, it’s time to check the usage in Java via Java High-Level REST Client. The code is straight forward and easy to understand: you need to prepare a creation request and submit this request via the Java client. During the preparation of the request, provide the options that you want to control. Most of them are optional, you can ignore them if you just want to use the default value of that option. The submission can be done synchronously or asynchronously. The following code shows the synchronous version:
var request = new CreateSnapshotRequest()
    .repository("dvf")
    .snapshot("transactions.2021-01-10")
    .includeGlobalState(false);
var response = restClient
    .snapshot()
    .create(request, RequestOptions.DEFAULT);
By default, the snapshot operation will return as soon as the snapshot is
initialized. If you want to wait until the completion of the snapshot, you can
change the setting waitForCompletion(boolean) to true.
Snapshot Progress
As discussed above, snapshot operations may not be complete when the creation response is returned. It may be just initialized and still in progress. To retrieve all currently running snapshots with detailed status information, you can use the following endpoint:
GET /_snapshot/_status
or only focusing on one repository, e.g. dvf:
GET /_snapshot/dvf/_status
or only one snapshot, e.g. transactions.2021-01-10:
GET /_snapshot/dvf/transactions.2021-01-10/_status
{
  "snapshots": [
    {
      "snapshot": "transactions.2021-01-10",
      "repository": "dvf",
      "uuid": "DJE_mHGQSi-IqpxPPmqn0g",
      "state": "SUCCESS",
      "include_global_state": false,
      "shards_stats": {
        "initializing": 0,
        "started": 0,
        "finalizing": 0,
        "done": 1,
        "failed": 0,
        "total": 1
      },
      "stats": {
        "incremental": {
          "file_count": 18,
          "size_in_bytes": 2644772
        },
        "total": {
          "file_count": 18,
          "size_in_bytes": 2644772
        },
        "start_time_in_millis": 1610891345219,
        "time_in_millis": 1204
      },
      "indices": {
        "transactions": {
          "shards_stats": {
            "initializing": 0,
            "started": 0,
            "finalizing": 0,
            "done": 1,
            "failed": 0,
            "total": 1
          },
          "stats": {
            "incremental": {
              "file_count": 18,
              "size_in_bytes": 2644772
            },
            "total": {
              "file_count": 18,
              "size_in_bytes": 2644772
            },
            "start_time_in_millis": 1610891345420,
            "time_in_millis": 602
          },
          "shards": {
            "0": {
              "stage": "DONE",
              "stats": {
                "incremental": {
                  "file_count": 18,
                  "size_in_bytes": 2644772
                },
                "total": {
                  "file_count": 18,
                  "size_in_bytes": 2644772
                },
                "start_time_in_millis": 1610891345420,
                "time_in_millis": 602
              }
            }
          }
        }
      }
    }
  ]
}
List Snapshots
Once the creation is done, you can perform a GET request to get one target
snapshot using its name (e.g. transaction.2021-01-10); multiple snapshots
separated by comma , (e.g. snapshot1,snapshot2); all snapshots using _all
or wildcard *.
GET /_snapshot/{repository}/{snapshot_expression}
GET /_snapshot/dvf/_all
GET /_snapshot/dvf/transactions.2021-01-10
{
  "snapshots": [
    {
      "snapshot": "transactions.2021-01-10",
      "uuid": "DJE_mHGQSi-IqpxPPmqn0g",
      "version_id": 7100199,
      "version": "7.10.1",
      "indices": [
        "transactions"
      ],
      "data_streams": [],
      "include_global_state": false,
      "metadata": {
        "taken_by": "Mincong",
        "taken_because": "regular backup"
      },
      "state": "SUCCESS",
      "start_time": "2021-01-17T13:49:05.219Z",
      "start_time_in_millis": 1610891345219,
      "end_time": "2021-01-17T13:49:06.423Z",
      "end_time_in_millis": 1610891346423,
      "duration_in_millis": 1204,
      "failures": [],
      "shards": {
        "total": 1,
        "failed": 0,
        "successful": 1
      }
    }
  ]
}
Restore Snapshot
Now we know how to create and list snapshots. It’s time to see how to restore a snapshot. Restore is an important operation because you never know if a backup (snapshot) works until you restore it! To restore a snapshot, you can use the following POST request by providing the name of the repository and the name of the snapshot:
POST /_snapshot/{repository}/{snapshot}/_restore
For example, restoring the snapshot transactions.2021-01-10 from the
repository dvf.
POST /_snapshot/dvf/transactions.2021-01-10/_restore
{
  "accepted": true
}
Note that there are a lot of options available for the restore operation, but it’s not the main goal of this article so I will just skip them. You can find them in the official documentation of Elasticsearch “Restore a snapshot (7.x)”.
As you can see from the HTTP response above, when a restore operation is launched, we only retrieve an acknowledgment from the HTTP response. To monitor the actual progress of the restore operation, you can use the index recovery API or the cat recovery API.
GET /transactions/_recovery
{
  "transactions": {
    "shards": [
      {
        "id": 0,
        "type": "SNAPSHOT",
        "stage": "DONE",
        "primary": true,
        "start_time_in_millis": 1610894357787,
        "stop_time_in_millis": 1610894359714,
        "total_time_in_millis": 1927,
        "source": {
          "repository": "dvf",
          "snapshot": "transactions.2021-01-10",
          "version": "7.10.1",
          "index": "transactions",
          "restoreUUID": "JdeVFJUUR26trdhKYY-aGg"
        },
      },
      ...
    ]
  }
}
GET /_cat/recovery
transactions 0 1.9s snapshot done n/a n/a 172.17.0.3 fff70d104028 dvf transactions.2021-01-10 18 18 100.0% 18 2644772 2644772 100.0% 2644772 0 0 100.0%
Now, let’s see how to do the same restore operation using Java client:
var request = new RestoreSnapshotRequest()
    .repository("dvf")
    .snapshot("transactions.2021-01-10");
var response = restClient
    .snapshot()
    .restore(request, RequestOptions.DEFAULT);
By default, the restore operation will return as soon as the restore request is
accepted. If you want to wait until the completion of the restore operation, you
can change the setting waitForCompletion(boolean) to true.
Going Further
How to go further from here?
- To learn more about snapshot and restore in Elasticsearch, visit page “Snapshot and restore (7.x)” of Elasticsearch and other pages in that section https://www.elastic.co/guide/en/elasticsearch/reference/7.x/snapshot-restore.html
- To learn more about dataset “Demande de valeurs foncières”, visit page https://cadastre.data.gouv.fr/dvf
Conclusion
In this article, we saw how to register a snapshot repository, create a snapshot, monitor the snapshot progress, and restore a snapshot back to an Elasticsearch cluster. All these operations are done using the open dataset “Demande de valeurs foncières (DVF)”. Interested to know more? You can subscribe to the feed of my blog, follow me on Twitter or GitHub. Hope you enjoy this article, see you the next time!
References
- Elasticsearch, “Snapshot and restore (7.x)”, 2021. https://www.elastic.co/guide/en/elasticsearch/reference/7.x/snapshot-restore.html
- Elasticsearch, “Create a snapshot (7.x)”, 2021. https://www.elastic.co/guide/en/elasticsearch/reference/7.x/snapshots-take-snapshot.html