Introduction
Writing tests is an important part of software development, it’s a good way to ensure that your code works as expected. However, it is difficult to write tests that cover all the scenarios. It’s also difficult to make them easy to understand when the implementation is complex. In this article, we are going to see how parameterized tests of JUnit 5 can help.
After reading this article, you will understand:
- The motivation of using parameterized tests
- How to use parameterized tests
- Different sources of arguments
- The argument conversion
- Interactions with IDE
- When to use or not to use parameterized tests?
- How to go further from here?
Motivation
Why should we consider using parameterized tests in our code?
Improve test coverage. Using parameterized testing can improve the code coverage. Thanks to parameterized test, you can easily add more parameters, or add more values for the same parameter to an existing test. This is done without heavily changing the logic of the test code. By doing so, your assertions cover more lines or more branches.
Reuse test code. Using parameterized testing reuses the same test case for multiple inputs. Therefore, it simplifies the code set up, improves the maintainability of these tests, and therefore save your time to develop other features or to write tests for other scenarios.
Clarify inputs and outputs. Sometimes the test code is not as readable as you may think about. Without putting additional effort into those tests, it can become a nightmare to understand the purpose of this test, such as what are the real input or output parameters of these tests. By using parameterized testing, we extract those values as external parameters. Therefore, it’s easier to understand. It’s easier because 1) we can see those parameters as method input parameters; 2) we can find the reasoning of the inputs by comparing their common points and differences.
Delegate the complexity to JUnit. But why not just adding a for-loop inside the test? Why using the parameterized testing feature in JUnit 5? Well, this is because by doing so, we delegate the complexity to JUnit. More precisely, JUnit ensures that each execution contains their set up and tear downs; the failure of one execution won’t impact the other, they are isolated; we can have a nice display name in IDE or build to explain the current execution; it can handle different sources and type conversions, etc.
Validate multiple implementations. Parameterized testing is also useful for validating multiple implementations. These implementations may need to respect the same specification. Therefore, we can express the expectations of this specification as tests and require all implementations to pass these tests. This is a good way to prevent regressions.
Testing the orthogonality. Sometimes, one method accepts multiple input parameters, they should be orthogonal. That is, the output of one scenario will only depend on one input parameter, not others. So when changing the value of any other parameters, the test result shouldn’t be changed. We can ensure that the orthogonality is respected through parameterized testing.
These are some reasons that I found during my daily development. I hope they are enough to convince you to try parameterized testing. Now we understood the motivation, we are going to check how to use it in the following section.
Prerequisite
Before using parameterized testing in JUnit 5, you have to declare 3
dependencies: the specification (API) and the implementation (engine) of the
JUnit 5, and also an additional module to support parameterized testing. Here is
what do they look like in the Maven POM file (pom.xml).
The specification (API) and the implementation (engine) are required for running JUnit 5. You probably have them in your project already.
<dependency>
  <groupId>org.junit.jupiter</groupId>
  <artifactId>junit-jupiter-api</artifactId>
  <version>5.7.0</version>
  <scope>test</scope>
</dependency>
<dependency>
  <groupId>org.junit.jupiter</groupId>
  <artifactId>junit-jupiter-engine</artifactId>
  <version>5.7.0</version>
  <scope>test</scope>
</dependency>
Then declare the additional Maven dependency to support parameterized testing:
<dependency>
  <groupId>org.junit.jupiter</groupId>
  <artifactId>junit-jupiter-params</artifactId>
  <version>5.7.0</version>
  <scope>test</scope>
</dependency>
Syntax
The basic syntax of a parameterized test is as follows:
@ParameterizedTest // 1
@ValueSource(strings = { // 2
  "racecar",
  "radar",
  "able was I ere I saw elba"
})
void palindromes(String candidate) { // 3
  assertTrue(StringUtils.isPalindrome(candidate));
}
where you can see that: 1) you need to use annotation @ParameterizedTest as
the replacement of the regular @Test; 2) an annotation containing a list of
sources to be used for the parameterized test; 3) one input parameter to
represent the source value provided by the annotation, it can also be multiple
input parameters: it depends on your sources.
Source Providers
@ValueSource annotation can be used to provide a list of values, which each
item contains one single argument. It is supported for types: short, byte,
int, long, float, double, char, boolean, java.lang.String,
java.lang.Class. However, you may notice that value source can only provide
one argument at a time, so you have to keep your test simple to ensure that all
these arguments will fit the test.
@ValueSource(ints = { 1, 2, 3 })
@ValueSource(booleans = {true, false})
@ArgumentsSource annotation can be used to link to an arguments-provider,
which provides a stream of argument arrays (Arguments) for the parameterized
tests. I found it useful for two cases: 1) providing multiple implementations of
the same interface, so that we can validate all of them using the same test, as
you can see in the code block below; 2) providing values that are computed from
another field in the codebase. This is not suitable for
@ValueSource because the line will be long and unreadable. Using
@ArgumentsSource makes the metadata of the test method more declarative.
@ParameterizedTest
@ArgumentsSource(ChatBotProvider.class)
void sayHello(ChatBot bot) {
  assertThat(bot.sayHello("Foo")).isEqualTo("Hello, Foo");
  assertThat(bot.sayHello("Bar")).isEqualTo("Hello, Bar");
}

public static class ChatBotProvider implements ArgumentsProvider {

  @Override
  public Stream<? extends Arguments> provideArguments(ExtensionContext context) {
    return Stream.of(new StringFormatChatBot(), new StringConcatenationChatBot())
        .map(Arguments::of);
  }
}
@CsvSource annotation can be used to declare multiple argument arrays, each
array representing one argument array. This is my favorite annotation for
providing sources because I can provide multiple arguments for each test case,
which is usually the case for enterprise development. You may notice that the
string value in the CSV source is converted to primitive type int by JUnit.
This makes your tests concise. We will talk more about conversions in the next
section.
@ParameterizedTest
@CsvSource({
  "1,  2, 2",
  "1, -1, 1",
  "1,  1, 1",
})
void testMax(int a, int b, int max) {
  assertThat(Math.max(a, b)).isEqualTo(max);
}
There are other source providers, such as @EnumSource, @NullSource,
@EmptySource, @MethodSource. They provide different types
of sources and they are easy to use. You can find the complete
documentation in JUnit 5 User Guide - 2.15.3 Sources of
Arguments.
Conversion
From my experience, the CSV source seems to be the most frequently used provider. But inside a CSV file, every row and every cell is considered as a string. In this section, I want to share some tricks about type conversion. It makes your code more concise: just let JUnit handle the work for you ;)
String-to-Primitive. When providing a primitive type as an input parameter for
the test case, JUnit knows how to convert it. For example, given an input
parameter as int, then JUnit will convert your string into an integer
automatically. The same logic applies to other primitive types: long, double, float,
boolean, etc.
@ParameterizedTest
@CsvSource({
  "1,  2, 2",
  "1, -1, 1",
  "1,  1, 1",
})
void testMax(int a, int b, int max) {
  assertThat(Math.max(a, b)).isEqualTo(max);
}
String-to-Enum. When providing an enumeration type as an input parameter for the
test case, JUnit knows how to convert it as well (probably using the
valueOf(String) function of enumeration). Therefore, you don’t have to handle
the conversion yourself. Here is a concrete example about how to converting a
string into enum type FilePermission, and then test the executability for
different permission.
@ParameterizedTest
@CsvSource({
  "R, false",
  "W, false",
  "RW, false",
  "X, true",
  "RX, true",
  "WX, true",
  "RWX, true",
})
void isExecutable(FilePermission perm, boolean isExecutable) {
  assertThat(perm.isExecutable()).isEqualTo(isExecutable);
}
IDE
Another important part of testing is to understand how to use IDE so that it can help you to be even more productive! In this section, I want to share two things about IDE with you: how to check which parameterized test is running and how to check the test coverage. Here I am using IntelliJ IDEA but I think the methodology is still valid for other IDEs.
IDE: Display Name of Tests
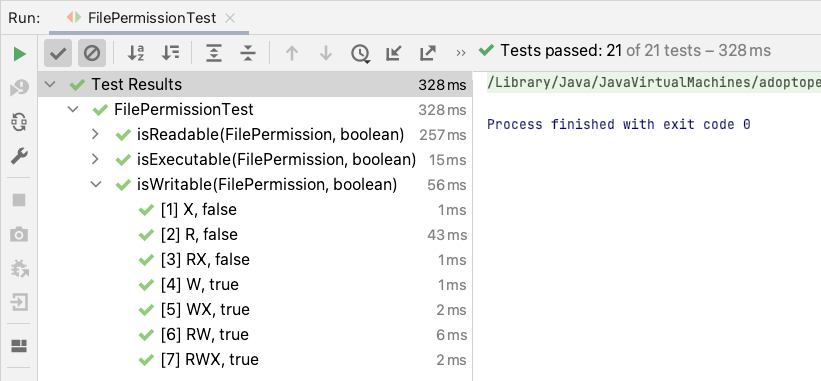
When running the parameterized in JUnit 5, you can see each test
execution with the input parameters. For example, the test case
isWritable(FilePermission, boolean) is executed 7 times with different file
permission each time:
It is also possible to customize the display names to print something more human-readable. Personally, I prefer to avoid spending time on it. But if you were interested, you can find it in the JUnit 5 User Guide §2.15.6. Customizing Display Names.
IDE: Test Coverage
The main motivation of using parameterized testing is to increase the test coverage and improve the robustness of the implementation. To review the test coverage, you can run the tests with coverage and then check the coverage. Here is how to trigger a “run tests with coverage” at package level or class level in IntelliJ IDEA:
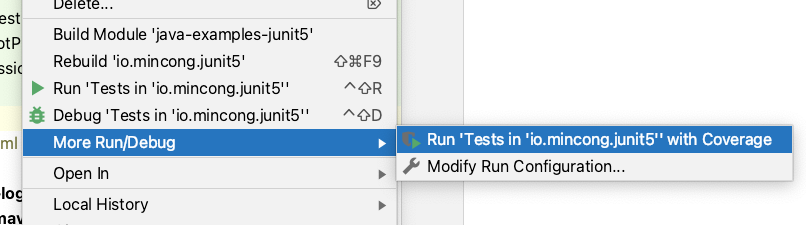
Right-click on a Java package, such as io.mincong.junit5 and select the option “Run ‘Test
in ‘io.mincong.junit5’’ with Coverage” to trigger the tests with coverage
enabled:
Left-click on the test icon of the class name or the test name of a test file,
such as FilePermissionTest, then select option “Run ‘FilePermissionTest’ with
Coverage” to trigger the tests with coverage enabled:

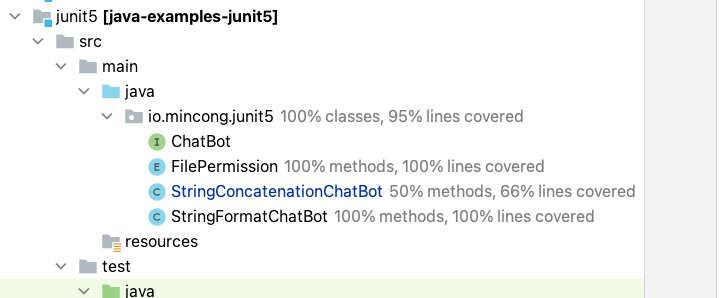
Once the test execution is done, you can find the coverage report in different views, such as the project view, the class file itself, or the dedicated test coverage view:
In the project, we can see the test coverage of each package and each class inside the package. It gives a good overview of the current situation of a given package.
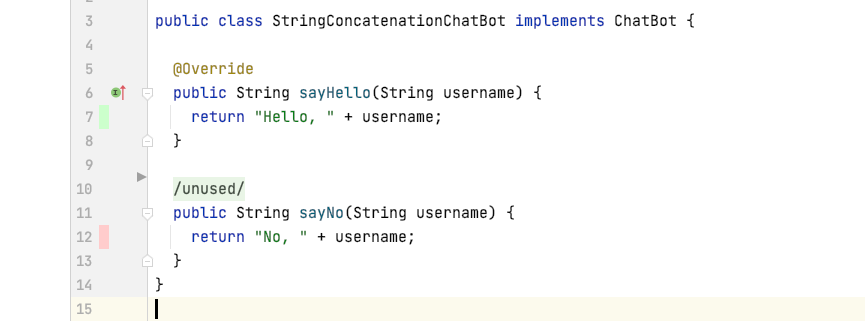
Inside a class, it’s also possible to see the code coverage right next to the line numbers. The color green is covered and the color red is not covered. This is useful when you are modifying some logic, especially for some critical path, because you want them to be covered by at least one test. This information helps you to improve your tests.
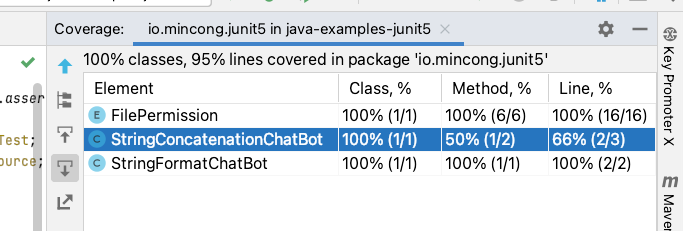
The last view is the coverage view, where you can see a list of packages and their coverage. You can also zoom into one package as the screenshot below and inspect the coverage of each file inside the package.
Pros and Cons
When to use and not to use parameterized tests?
Now we understood how to use parameterized tests and get familiar with IDE, the remaining question is: should we use it for our tests? I think it depends on your needs. It’s not always the right choice. Here are some cases that I summarized during my daily work. I hope that they will give you some inspiration.
As mentioned in the motivation section, you should use parameterized tests to:
- Improve the test coverage
- Reuse test code
- Clarify inputs and outputs of your test
- Delegate the complexity to JUnit
- Validate multiple implementations
- Testing the orthogonality of different parameters
But you shouldn’t use parameterized tests:
- if it makes the logic of the test difficult the understand. Typically, if it introduces if-statements or other branches in the code.
- if different arguments don’t share the same purpose. If they are different, it is probably worth creating multiple test cases. A good way to know this is to summarize the purpose in one sentence, if you cannot, it’s probably worth writing different tests.
- if there are too many input arguments. This can make the tests difficult to maintain.
Going Further
How to go further from here?
- To better understand parameterized tests of JUnit 5, visit the official JUnit 5 User Guide §2.15 Parameterized Tests.
- To learn more about testing, especially testing in Java, visit other articles with tag “testing” of my blog.
If you want to see the source code of this article, they are available on GitHub under module junit5 of project mincong-h/java-examples.
Conclusion
In this article, we saw the motivation of using parameterized testing in JUnit 5, how to declared dependencies, the annotations of different source providers (value source, argument source, CSV source, …), the conversation from string to primitive types and enum types, running tests and inspecting coverage in IntelliJ IDEA, the pros and cons of using parameterized tests, and finally how to go further from here. Interested to know more? You can subscribe to the feed of my blog, follow me on Twitter or GitHub. Hope you enjoy this article, see you the next time!
References
- JUnit 5 User Guide, 2020. https://junit.org/junit5/docs/current/user-guide/