![]()
Today, I would like to share how to configure your Java project with Maven and Sonar, a powerful tool for continuous code quality analysis. After reading this article, you’ll understand:
- What is SonarQube and SonarCloud
- How to configure Sonar in Maven
- How to configure Jenkins
- Settings in SonarCloud
- Suppress Sonar warnings in your project
Introduction of SonarQube and SonarCloud
SonarQube provides the capability to not only show health of an application but also to highlight issues newly introduced. With a Quality Gate in place, you can fix the leak and therefore improve code quality systematically. Sonar code analyzers are equipped powerful path sensitive dataflow engines to detect tricky issues such as null-pointers dereferences, logic errors, resource leaks…
They have also an online version, Sonar Cloud, which allows you to upload the analyse result without hosting the SonarQube server yourself. Here’s an example coming from my own project “Alumni Server”:

Maven Configuration
There’re 2 parts that we need to configure in Maven:
- Plugin management: define the behaviors of Sonar and JaCoCo.
- Profile: define a profile for SonarCloud execution
In the Maven <pluginManagement> section, we need to configure the default
behaviors of Sonar plugin, meaning that we define the version used, the goal
binding of Sonar scanner. Binding sonar:sonar to verify helps us the
facilitate the code analysis: sonar will be executed any Maven command in which
phase verify is included. In the same time, we also define JaCoCo, a Maven
plugin for detecting the test coverage of unit tests and integration tests,
using respectively the goals prepare-agent and prepare-agent-integration.
Test coverage report will be generated by goal report.
<pluginManagement>
  <plugins>
    <plugin>
      <groupId>org.sonarsource.scanner.maven</groupId>
      <artifactId>sonar-maven-plugin</artifactId>
      <version>3.5.0.1254</version>
      <executions>
        <execution>
          <phase>verify</phase>
          <goals>
            <goal>sonar</goal>
          </goals>
        </execution>
      </executions>
    </plugin>
    <plugin>
      <groupId>org.jacoco</groupId>
      <artifactId>jacoco-maven-plugin</artifactId>
      <version>0.8.2</version>
      <configuration>
        <append>true</append>
      </configuration>
      <executions>
        <execution>
          <id>prepare-agent</id>
          <goals>
            <goal>prepare-agent</goal>
          </goals>
        </execution>
        <execution>
          <id>prepare-agent-integration</id>
          <goals>
            <goal>prepare-agent-integration</goal>
          </goals>
        </execution>
        <execution>
          <id>jacoco-site</id>
          <phase>verify</phase>
          <goals>
            <goal>report</goal>
          </goals>
        </execution>
      </executions>
    </plugin>
  </plugins>
</pluginManagement>
In the Maven <profile> section, create a new profile for Sonar code analysis.
You need to define certain Sonar analysis parameters, in order
to match your SonarQube instance requirements.
<profile>
  <id>sonar</id>
  <properties>
    <sonar.host.url>https://sonarcloud.io</sonar.host.url>
    <sonar.organization>mincong-h-github</sonar.organization>
  </properties>
  <build>
    <plugins>
      <plugin>
        <groupId>org.jacoco</groupId>
        <artifactId>jacoco-maven-plugin</artifactId>
      </plugin>
      <plugin>
        <groupId>org.sonarsource.scanner.maven</groupId>
        <artifactId>sonar-maven-plugin</artifactId>
      </plugin>
    </plugins>
  </build>
</profile>
Once every configuration is ready, you can run Sonar code analysis alongside
with all the tests as following in your local machine, where SONAR_LOGIN_TOKEN
is the authentication token of a SonarQube user with
Execute Analysis permission:
mvn clean verify -P sonar \
    -Dsonar.login=$SONAR_LOGIN_TOKEN
In my case, it seems that I must let sonar to execute with the tests, so that Java code coverage plugin JaCoCo can analyse the test results correctly. Otherwise, the code coverage will be 0.
Jenkins Configuration
The next step is to configure Sonar analysis on Jenkins. The goal is to integrate Sonar as part of the master job. In order to do that, you need to have a Sonar token for Jenkins. Once you have done this, you need to modify your job as follows:
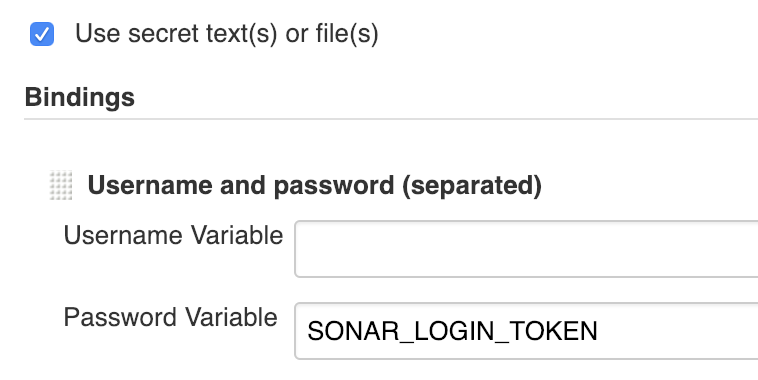
- Enable option Use secret text(s) or file(s) in section Build Environment
- Add binding Username and password (separated) in Bindings
- Keep “Username variable” empty
- Name “Password variable” as
$SONAR_LOGIN_TOKEN - Credentials of type “Specific credentials” and select the Sonar one from from the list. In my case, the SonarCloud token is already available on Jenkins. If it’s not your case, you might need to contact your administrator.
-
Build as maven-3 with goals and options:
clean verify -P sonar -Dsonar.login=$SONAR_LOGIN_TOKEN
Screenshot of SonarCloud token configuration in Jenkins job:
Now, your Jenkins job is ready. After running the job once, you should be able to see your code analysis on Sonar cloud. Notice that, if the target project does not exist on SonarCloud and the token has enough permission, SonarCloud will create the project after the first analysis report upload. Else, you need to ask the organization admin to create it for you on SonarCloud.
SonarCloud Configuration
It’s preferable to use a machine account to upload code analysis via Jenkins. Before uploading, ensure that the machine account has enough permission to do it. In other words, this account need to be a member of the target organization.
Suppress Sonar Warnings
Sometimes you might want to suppress Sonar warnings in a specific scope. It allows to disable inappropriate analyze results.
Suppress all warnings at one line:
System.out.println("Hi"); // NOSONARSuppress one specific warning at method level:
@SuppressWarnings("squid:S106")
public void sayHi() {
  System.out.println("Hi");
}
Next Steps
Now we’ve successfully configured the Sonar scanner in Maven for the first analysis. As for the next steps, I think you might be interested in:
- Exploring the analysis results in Sonar
- Replace classical Jenkins job by
Jenkinsfilespipeline - Configure GitHub integration of Sonar auto-reply in pull requests
- Enable SonarLint in your IDE
They’re the future topics that I might be presented in my blog. Thanks for your attention. Please stay tuned!