This article is translated with Google Translate and reviewed by Mincong.
Problem
A red index appeared on the production line because of the use of Force Merge API:
"store_exception": {
    "type": "corrupt_index_exception",
    "reason": "failed engine (reason: [corrupt file (source: [force merge])]) (resource=preexisting_corruption)",
        "caused_by": {
        "type": "i_o_exception",
        "reason": "failed engine (reason: [corrupt file (source: [force merge])])",
        "caused_by": {
            "type": "corrupt_index_exception",
            "reason": "checksum failed (hardware problem?): expected=70193aa8 actual=c48ab092 (resource=BufferedChecksumIndexInput(NIOFSIndexInput(path=\"/usr/share/elasticsearch/data/nodes/0/indices/w76sdoDFRm-xxxxxxxxxxx/0 /index/_ke.fdt\")))"
        }
    }
}
Because of this index, the health of the Elasticsearch cluster is in red, and an urgent fix is needed.
Situation Analysis
Preliminary investigation:
- The cluster does not use Elasticsearch Snapshot for backup
- The index is not being written with new data, and the data is old data two weeks ago, which is basically read-only.
- Tried restarting the corresponding data node, but it didn’t get better
A similar situation was found on the Elastic forum, and someone encountered a damaged index that needed to be repaired Corrupted elastic index:
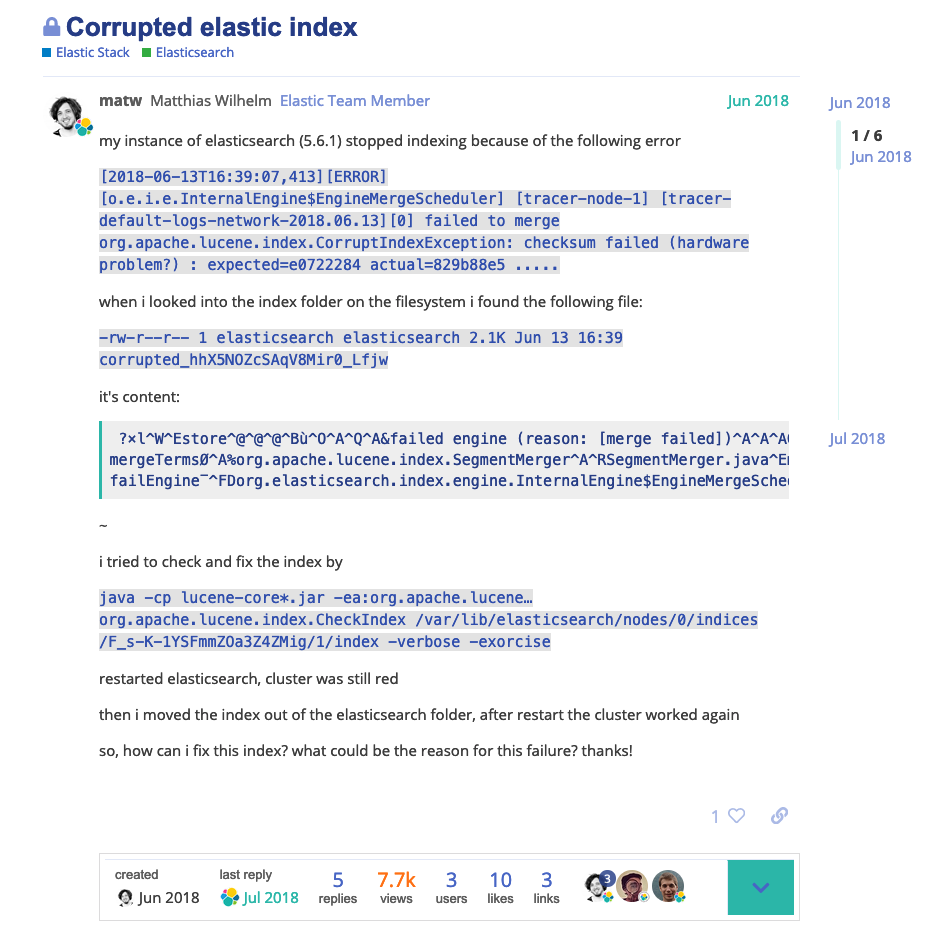
In the forum question, Mr. Thiago Souza and Mr. Yannick Welsch each provided a solution. Let’s take a look together.
Potential solution provided by Thiago Souza:
This is an indication of either hardware errors (check dmesg) or that it maybe ran out of disk space.
At this point segments are corrupted and data is lost, meaning that you can’t recover the whole index anymore. Unless you have a snapshot (which is recommended for production).
There are a couple of options to try to partially recover this index:
- Try to partially recover the corrupted shard:
- Close the index.
- Set
index.shard.check_on_startup: fixfor this index. - Open the index. At this time index will start to be verified and may take a long time.
- If it recovers, then you need to redo step 1 to 3 but set
index.shard.check_on_startup: falseotherwise it will always try to fix when it opens again.
- If shard can’t be partially recovered then the only way is to completely drop it so at least the index can be recovered with the other healthy shards. For doing that you could try the
allocate_empty_primarycommand of Cluster Reroute API 109.
None of these are guaranteed to work as it is highly dependent of the type of damage.
Potential solution provided by Yannick Welsch:
Note that the corruption marker file corrupted_* will prevent the shard from being allocated as primary. This file is managed by Elasticsearch, and is unaware of the fact that you’ve fixed the index using Lucene’s CheckIndex. Removing this failure marker file should allow this shard to be allocated again.
Resolution Steps
Next, we will try the solutions suggested by these two engieers.
Step 1: Try to Fix The index
Try Thiago Souza’s suggestion to partially repair the corrupted shards:
- Try to partially recover the corrupted shard:
- Close the index.
1.1 Use Close Index API (7.x) Close the index:
curl -X POST localhost:9200/MY_INDEX/_close
Note that after closing the index, the index will not be able to write new data.
\2. Set
index.shard.check_on_startup: fixfor this index.
1.2 Add the configuration index.shard.check_on_startup: fix to configure the index level configuration so that the corresponding check can be performed when the index is started. However, after Elasticsearch 7.0, the fix option has been permanently removed and can no longer be used. Let’s take a look at the official document Index Modules (6.8) to better understand the configuration index.shard.check_on_startup:
Whether or not shards should be checked for corruption before opening. When corruption is detected, it will prevent the shard from being opened.
It accepts the following options:
| Option | Description |
|---|---|
| false | (default) Don’t check for corruption when opening a shard. |
| checksum | Check for physical corruption. |
| true | Check for both physical and logical corruption. This is much more expensive in terms of CPU and memory usage. |
| fix | The same as false. This option is deprecated and will be completely removed in 7.0. Same as false. (Note: it was deprecated in PR-32279) |
So for an Elasticsearch 7.x cluster, you should try:
curl -X PUT localhost:9200/MY_INDEX/_settings \
  -H'Content-Type: application/json' -d'
{
  "index.shard.check_on_startup": false
}
'
But I think this option is invalid, because false means that no corruption will be checked and fixed. Moreover, as mentioned in the Problem section at the beginning of the article, restarting the data node did not improve the situation and the problem persists. I also tried true and didn’t fix anything.
\4. If it recovers, then you need to redo step 1 to 3 but set
index.shard.check_on_startup: falseotherwise it will always try to fix when it opens again.
1.4 Skip this step, because the previous step was unsuccessful and there is no need to continue. Before proceeding to the next step, clear the configuration set above and restore the default configuration.
Step 2: Accept data loss?
- If shard can’t be partially recovered then the only way is to completely drop it so at least the index can be recovered with the other healthy shards. For doing that you could try the
allocate_empty_primarycommand of Cluster Reroute API (7.x).
As a data engineer, how can we accept data loss casually? Can’t accept it! Let’s take a look at Mr. Yannick Welsch’s advice first.
Step 3: Fix through Lucene level
Try to fix the data according to the original steps provided by Mr. Matthias Wilhelm, that is:
- Log in to the data node remotely
- Run Lucene repair tool CheckIndex
- Remove the corrupted flag file
corrupted_*so that Elasticsearch can start normally
The specific operations are as follows.
First, you can use Elasticsearch’s Explain API (7.x) Find the corresponding shard that cannot be allocated and the machine where it is located. Then log in to the machine remotely.
The second point is to repair shards (also known as Lucene Index). This is detailed in Lucene’s Javadoc, such as CheckIndex (Lucene 6.4.0 API)
Command-line interface to check and exorcise corrupt segments from an index.
Run it like this:
java -ea:org.apache.lucene... org.apache.lucene.index.CheckIndex pathToIndex [-exorcise] [-verbose] [-segment X] [-segment Y]


-exorcise: actually write a new segments_N file, removing any problematic segments. *LOSES DATA*
-segment X: only check the specified segment(s). This can be specified multiple times, to check more than one segment, eg -segment _2 -segment _a. You can't use this with the -exorcise option.
WARNING:
-exorciseshould only be used on an emergency basis as it will cause documents (perhaps many) to be permanently removed from the index. Always make a backup copy of your index before running this! Do not run this tool on an index that is actively being written to. You have been warned!Run without
-exorcise, this tool will open the index, report version information and report any exceptions it hits and what action it would take if -exorcise were specified. With-exorcise, this tool will remove any segments that have issues and write a new segments_N file. This means all documents contained in the affected segments will be removed.This tool exits with exit code 1 if the index cannot be opened or has any corruption, else 0.
After confirming that you want to use the repair tool CheckIndex, you need to confirm:
- The specific location of Elasticsearch shards. If a machine has only one Elasticsearch server running, it should be in a folder under
${ES_HOME}/data/nodes/0/indices/.... The specific path can be seen in the Explain API reponse (see the JSON excerpt at the beginning of the article). - The specific location of the Elasticsearch library. It should be in
${ES_HOME}/lib. We need this location because it is where Lucene Core’s JAR files are stored. - Decide whether to back up the shards first, and then perform the fix.
After everything is ready, execute the following command. Note that the three dots after Lucene are three characters dot, not one character, because some operating systems/blogs will switch them to another similar character.
cd /usr/share/elasticsearch/lib
java -cp lucene-core*.jar -ea:org.apache.lucene... org.apache.lucene.index.CheckIndex /usr/share/elasticsearch/data/nodes/0/indices/w76sdoDFRm-xxxxxxxxxxx/0/ index -verbose -exorcise
After executing the command, CheckIndex returns:
No problems were detected with this index.

Took 118.609 sec total.
Uh. . . So there are no problems? No data corruption at all? Could it be an unexpected situation, and Elasticsearch did not handle the exception correctly?
Ok. Since the data is not corrupted, the next step is to move the corrupted flag file corrupted_* to another folder (equivalent to removal). After a while, this shard was restored: it was successfully allocated, and it does not appear in the Explain API. There is no need to restart the server during this process. Next, connect to other machines and perform the same operation on all related red shards (shards that were not successfully allocated). Finally, the cluster turned back to green again, oh yeah!
Conclusion
In this article, we saw the red index caused by the use of Force Merge API. With the help of the Elastic forum, I tried to fix the data through index.shard.check_on_startup: fix, but this option no longer exists in Elasticsearch 7. We saw that through allocate_empty_primary it is possible to accept partial data loss and keep the remaining healthy fragments, but we did not do this because we wanted to get all the data back. Next, we used the CheckIndex tool to repair at the Lucene level and found that there was no data corruption, which was actually a false alarm. Finally, remove the data corruption label file corrupted_* to realize recovery.
I hope this article about Elasticsearch in practice can bring you some new inspiration. If you are interested in learning more about Elasticsearch, please follow my GitHub account mincong-h. Thank you all!
References
- Matthias Wilhelm, “Corrupted elastic index”, Elastic.co, 2021. https://discuss.elastic.co/t/corrupted-elastic-index/135932